Build a Birdhouse and Install It in Your Garden to Enjoy Their Cheerful Chirping
Creating a birdhouse in your garden is not just a delightful project; it also contributes to the well-being of local bird populations. Birdhouses provide essential nesting sites for various species, especially in urban areas where natural habitats are diminishing. This article will guide you through the benefits of building a birdhouse, the steps to create one, and how to install it effectively in your garden.
The Benefits of Birdhouses
Birdhouses offer numerous advantages, both for the birds and for you as a gardener. Here are some key benefits:
- Encourages Biodiversity: By providing nesting sites, you help support local bird populations, which can lead to a more diverse ecosystem in your garden.
- Pest Control: Birds are natural pest controllers. Species like bluebirds and wrens feed on insects, helping to keep your garden healthy.
- Educational Opportunities: Building and observing birdhouses can be a great educational experience for children and adults alike, fostering a love for nature.
- Aesthetic Appeal: A well-placed birdhouse can enhance the visual appeal of your garden, adding charm and character.
Choosing the Right Design
Before you start building, it’s essential to choose a birdhouse design that suits the species you want to attract. Different birds have varying requirements for nesting. Here are some popular designs:
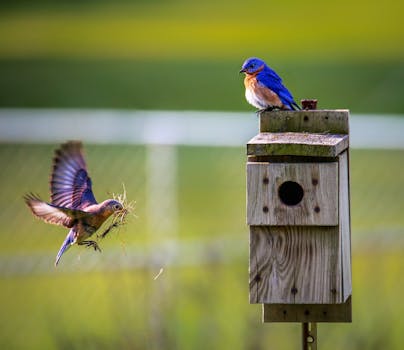
- Bluebird House: These houses should be about 6 inches by 6 inches with a 1.5-inch entrance hole, placed 4-6 feet off the ground.
- Wren House: A smaller house, approximately 4 inches by 4 inches, with a 1-inch entrance hole, is ideal for wrens.
- Chickadee House: Similar in size to the wren house, but with a slightly larger entrance hole of 1.25 inches.
Consider the materials as well; untreated wood is preferable as it is safe for birds. Cedar and pine are excellent choices due to their durability and natural resistance to decay.
Step-by-Step Guide to Building a Birdhouse
Building a birdhouse can be a fun and rewarding DIY project. Here’s a simple step-by-step guide:
- Gather Materials: You will need wood (cedar or pine), nails or screws, wood glue, sandpaper, and a saw.
- Cut the Wood: Cut the pieces according to your chosen design. Typically, you will need a base, four walls, and a roof.
- Assemble the Walls: Start by attaching the walls to the base using nails or screws. Ensure the entrance hole is positioned correctly.
- Add the Roof: Attach the roof pieces, ensuring they overhang slightly to protect the entrance from rain.
- Finishing Touches: Sand any rough edges and apply a non-toxic sealant if desired. Avoid painting the inside of the birdhouse.
Installing Your Birdhouse
Once your birdhouse is built, it’s time to install it in your garden. Here are some tips for optimal placement:
- Height: Install the birdhouse at a height appropriate for the species you want to attract, generally between 4 to 10 feet off the ground.
- Location: Choose a quiet area away from heavy foot traffic and predators. Ideally, place it near trees or shrubs for shelter.
- Orientation: Position the entrance hole away from prevailing winds and direct sunlight to protect the birds from harsh weather.
Enjoying the Benefits of Your Birdhouse
After installation, be patient. It may take some time for birds to discover your new birdhouse. Once they do, you’ll be rewarded with the cheerful chirping and vibrant activity of your feathered friends. Observing birds can be a calming and joyful experience, enhancing your connection to nature.
Conclusion
Building and installing a birdhouse in your garden is a fulfilling project that benefits both you and local wildlife. By providing a safe nesting site, you contribute to the conservation of bird species while enjoying the beauty and sounds of nature. Remember to choose the right design, follow the building steps carefully, and install it thoughtfully. With a little patience, your garden will become a lively sanctuary for birds, enriching your outdoor experience.